This unit
in chemistry, we added to our story on the composition and added more
properties of the atom and about compounds and we did this through multiple
labs and quizzes and homework packets.
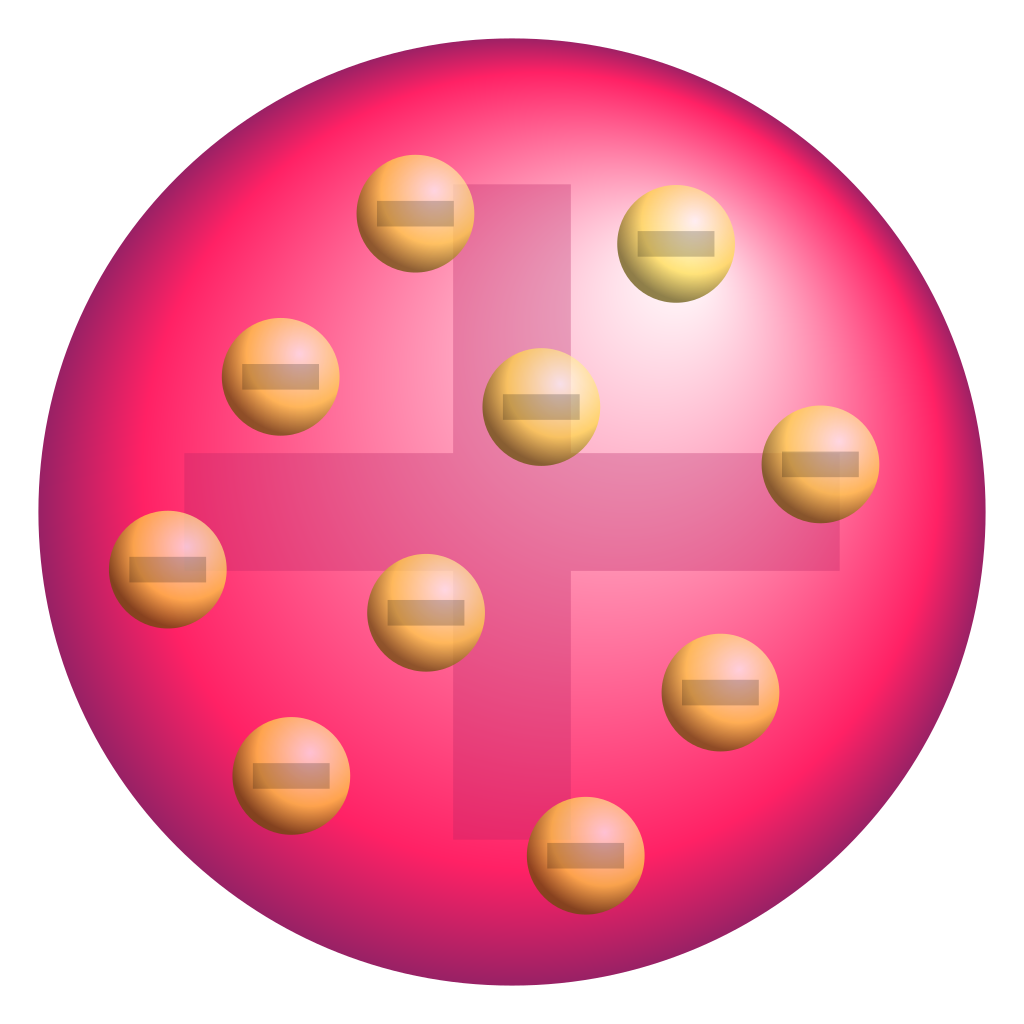
We started
out with the Sticky Tape Lab. The purpose of the lab, ultimately, was to
discover the electron, and some of the things it does. It helped us with our
conductivity lab because we learned about nonmetal’s strong positive core and
metal’s weak positive core making that makes metals conductive. It redefined
our model of the atom as we learned that electrons stay together in a positive
gas-like cloud.

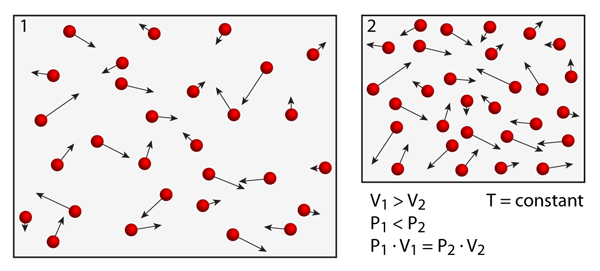
Next was
the conductivity lab, its purpose was to introduce us to ionic compounds. It
helped us learn about them because it showed us that when a metal and nonmetal
are bonded they become neutral, which is a property of ionic bonding. When we
put the ionic compound in water, we found that the bonds split water is polar,
meaning it has a positive and negative side, and the metal became conductive in
the solution.
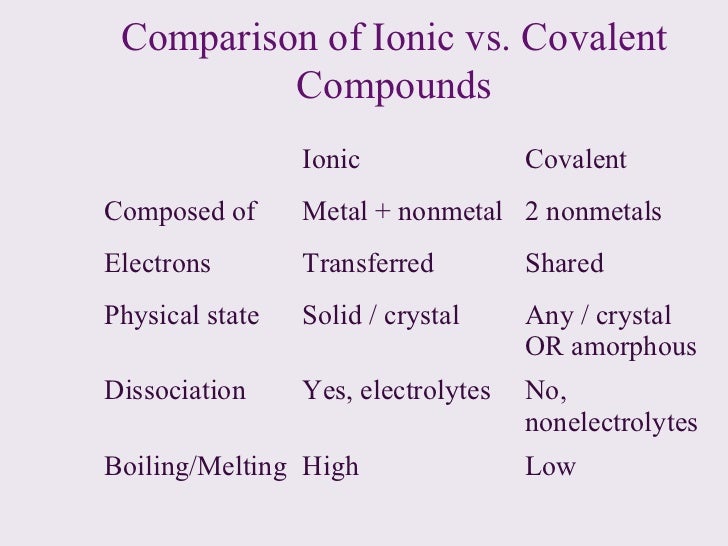
The
difference between ionic compounds and molecular compounds is that ionic
compounds are between metals and nonmetals and when bonded they become neutral.
However, molecular compounds are between nonmetals and they do not become neutral,
they are only focused on getting 8 electrons.
We also
learned how to name ionic compounds. If it is a transition metal then you must
name it with a roman numeral, and then end the nonmetal in –ide, for example;
Iron (II) Chloride. If it is only a regular metal, then you do not write the
roman numeral, but still end the nonmetal in –ide, for example; Sodium
Chloride. We learned how to name ionic compounds with polyatomic compounds, such
as Nitrate and Sulfite. In this case you use the same rules for naming with
metals, but the nonmetal polyatomic compound ends with its corresponding ending,
for example; Calcium Sulfate. Note how it is no longer ending in –ide. There is
an exception with the polyatomic compound and ionic bonding naming with
Ammonium (NH4), where it actually replaces the metal, for example;
Ammonium Nitrate. No other rules change in the naming.

Writing formulas for ionic
compounds is another thing we learned. All you have to do is take the name,
such as Zinc Nitride, and find the charge each has and find the amount of atoms
of that specific element takes to cancel the electrons out. So the formula for
Zinc Nitride would be Zn3N2. As Zinc has a +2 charge and
Nitride has a -3 charge, you need 3 Zinc atoms and 2 Nitride atoms to make the
compound neutral. If the ionic compound consists of a polyatomic compound, then
the formula is a little different in looks, but the process is the same. Find the
element/compound’s charges and write the formula so they cancel out. It will
look something like this; Ca(ClO3)2 as Calcium has a +2
charge and Chlorate has a -1 charge, you must write parentheses to group the
whole compound and then write the subscript for how many times it appears in
the whole compound, if it only appears once, parentheses are not needed.
Molecular compounds are named
differently from ionic compounds. If the first element only appears once then
you do not need a prefix, but the second element, regardless of how many times
it appears needs a prefix, the prefixes listed in order are mono for 1, di for
2, tri for 3 tetra for 4, penta for 5, hexa for 6, hepta for 7, octa for 8,
nona for 9, and finally deca for 10. So the compound will look something like
this; Carbon Dioxide, or Dihydrogen Monoxide, depending on the amount of times
the element appears in the compound.

Writing the formulas for molecular
compounds is pretty straightforward as you write the number of times each
element appears in the compound. For example, it might look like CO2
or H2O, where you can tell by the prefix how to write the formula
and which numbers to assign to which elements.
These are all of the major things
we learned throughout Unit 6 in Accelerated Chemistry with the teacher that
gives us pizza.